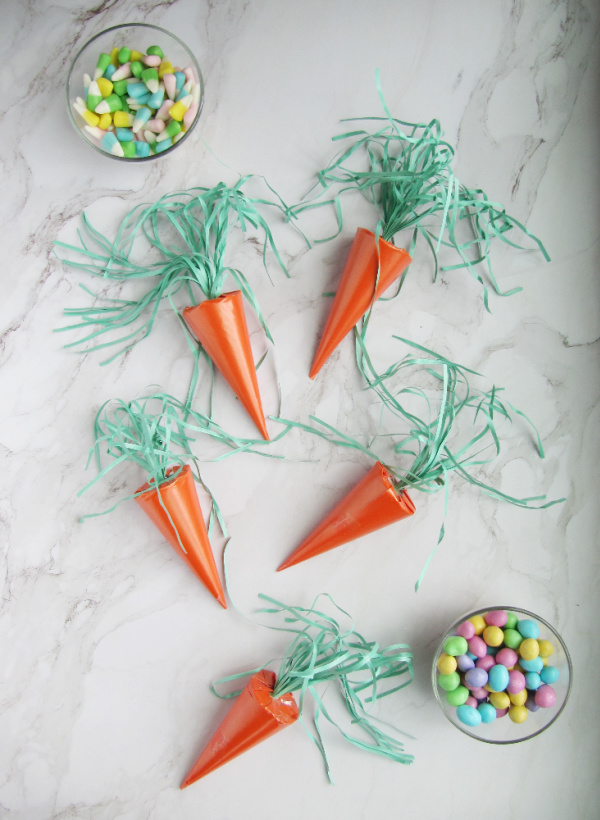
DIY Easter surprise carrot favors are perfect for baskets or to use as place card holders at your Easter dinner. These hand-crafted favors can be filled with tasty treats, M&M’s, jelly beans, chocolates or small toys.
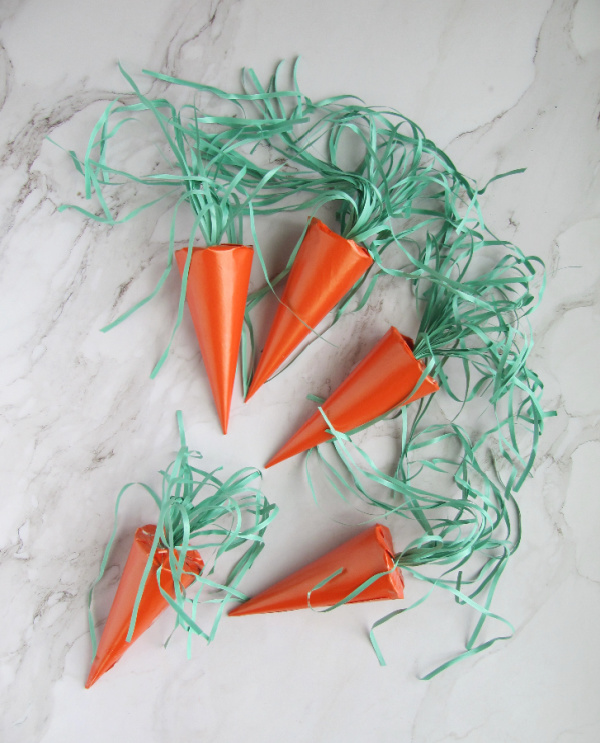
Hippity Hopity – Easter is on its Way! Can you believe that Easter is just around the corner? In fact it’s a little over three weeks away? I cannot wait to start baking my favorite Easter sugar cookies, filling baskets and indulging in a slice of carrot cake. This year I am also adding DIY Terrain Inspired Easter Carrot Favors to my baskets and to my table.

Last year I made edible Easter cone favors in cellophane bags. Although I liked them I wanted to make something a little more festive this year, something that reflected the season. I came across these Terrain and Anthropologie and I think they are creative, whimsical and a fun addition to any holiday table.
To be honest, I really didn’t want to spend $24.00 for four of them much less $48.00 because I need 6. I also did not like the toys inside, I would prefer a sweet treat like or .
In order to get what I wanted I decided to make my own Easter carrot party favors and it could not have been easier. These Easter carrot favors are an easy Easter craft to make with your children or grandchildren, to give to family and friends and as suggested to use at your holiday table.
How To Make a DIY Terrain Inspired Easter Carrot Favors

Supplies for Easter Surprise Inside Carrot Favors
- Wrapping paper, orange, pink, or craft paper for neutral decor
- Tissue Paper
- green ribbon
- green easter grass
- tape
- scissors
- cardboard
- sugar cones
- candy, or small toys for kids
DIY Carrot Favor Instructions
Gather your supplies. You can find most, if not all of the supplies for these surprise carrot favors at The Dollar Tree, on Amazon or at your local store.
Carrot
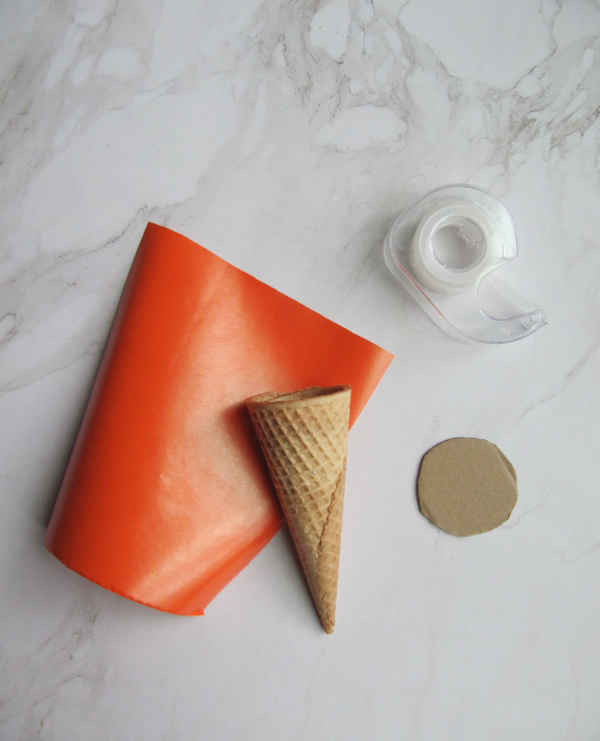
1. Cut a square of wrapping paper or tissue paper. I used orange wrapping paper and using the guide on the reverse I cut my paper in 5 x 5 squares.
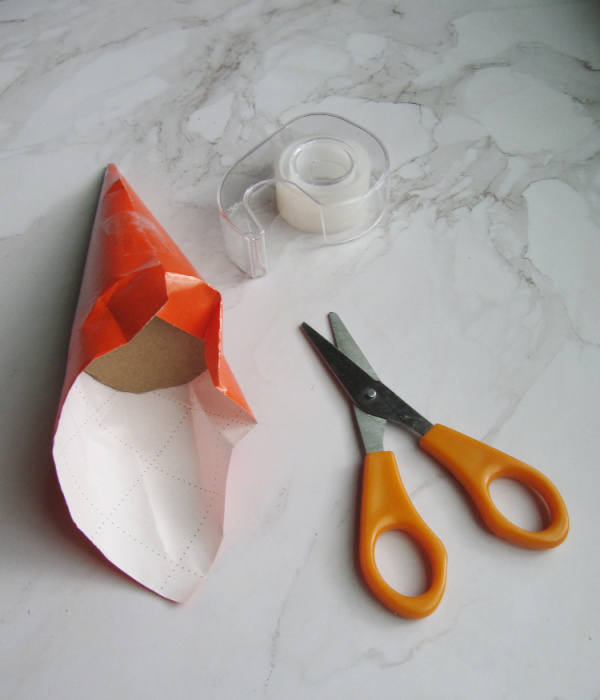
2. Next, take a sugar cookie cone and place it in the corner of the wrapping paper. Then roll the paper around the cone and tape the back to hold the paper in place. Set aside the cones while you make the tops of the carrot.
Carrot Top
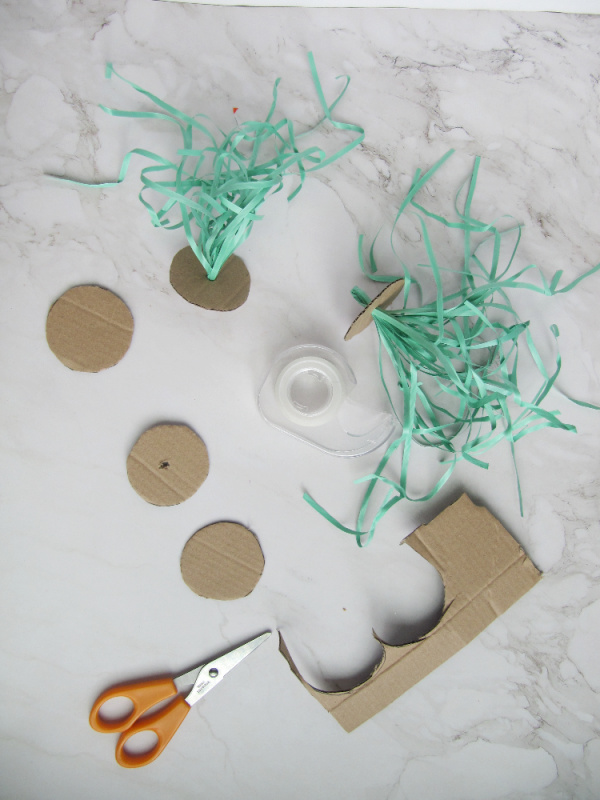
1.Trace a circle on recycled cardboard using the sugar cone as a template. Then poke a hole in the center using your scissors or skewer.

2. Next take some Easter grass and lay it in a straight line.Tie it in the center with another piece of Easter grass to secure the strands.
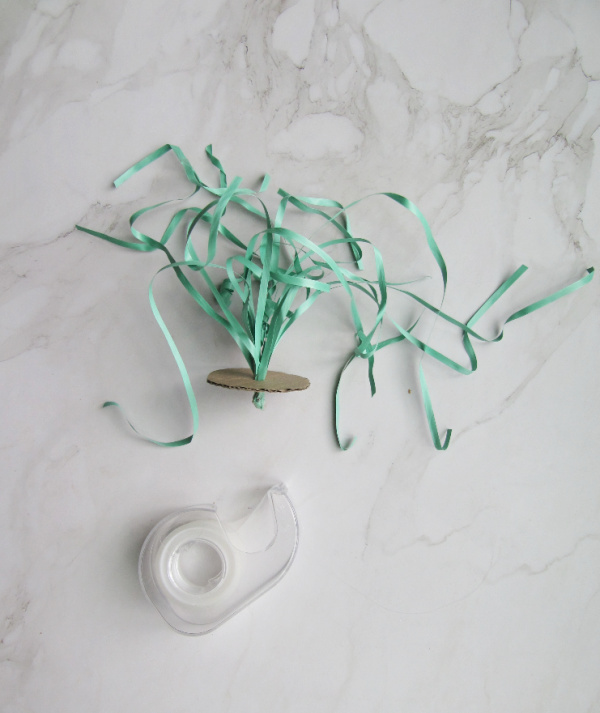
3. Take the grass and fold in half. Then twist the bottom and stick the grass into the hole of the round cardboard circle.
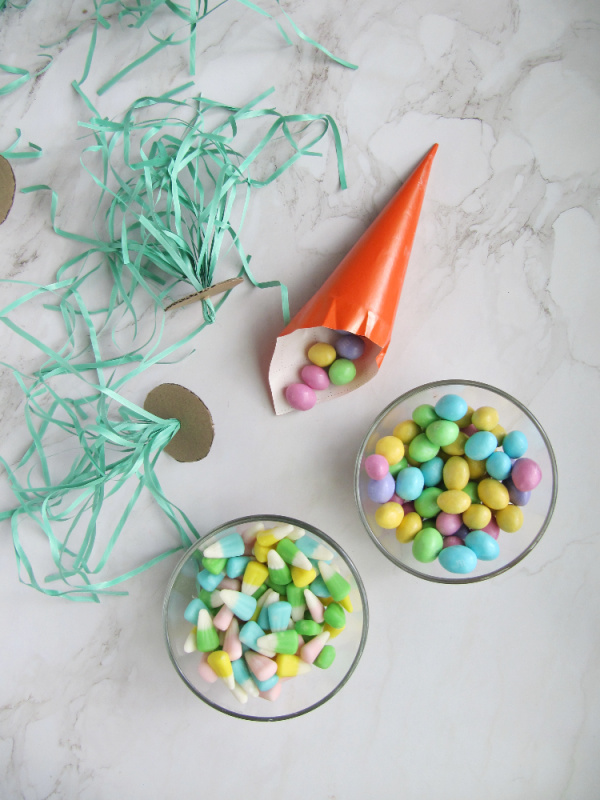
4.Fill the wrapped cone with sweet treats, chocolate or small toys. Then place the grass cardboard top onto the cone, fold the excess paper around the grass stems and tape.

Tips/Notes
The original Terrain surprise carrots are made using tissue paper, you can use that as well, if you prefer. I used the orange paper from The Dollar Tree because it seemed easier.
You can fill the cones with candy, small toys, or even mini cookies or leave them empty.
Don’t limit yourself to orange carrots, carrots come in all sorts of colors, purple, red, and white are also common. You could make carrots to coordinate with your decor or place settings.
If you are using them for place cards, hand letter the paper before you wrap the cone or use rubber stamps.
What to Do With Carrot Easter Favors
- Use as a place card
- Gift as small gift to family and friends
- Use as a party favor
- Add to Easter Baskets
- Make a bunch, no pun intended, and use as part of your Easter centerpiece

THAT’S ALL FOR NOW
I hope that you enjoyed my easy DIY Carrot favors! If you make them with your children or grandchildren please let me know and share a photo as well.
Have a great day and thank you for spending part of it with me. Stay safe if you are without power from the storm.
Don’t forget to Subscribe to the blog and you will get the latest recipes and post to your inbox! Or you can also keep up with me on Pinterest, Instagram, and Facebook. And last but not least, if you like Pinecones & Acorns share it with a friend!
This post contains affiliate links, if you make a purchase I will earn a small commission.
Pin Me For Later


They are perfectly adorable, Elizabeth! Good job! My imagination is in gear, and I am thinking I could dip those sugar cones in melted white chocolate tinted orange. I love the simplicity of the method and think they will appeal to kids of any age. 🙂
Thank you Michele! I am going to try your idea too! Have a great week.
VERY CUTE INDEED!
$48.00 is RIDICULOUS!
PS. THE SAVE MY NAME AT THE BOTTOM IS NOT WORKING!I
DO IT EVERY TIME AND I STILL HAVE TO REDO IT!
Thank you for letting me know Elizabeth, I will ask the tech guy about it.
These are so cute. Thank you for the DIY.
Thank you Kristen!
These are adorable! So much fun too!
Pinned!
Very nice! The carrot favors will be fun as well for summer salad lunches, and picnics.
Thank You May! Have a wonderful day!
Thank you Cindy!
Good ideas.
Thank you
You have such adorable ideas, love this so much!
Thank you Rachel.
I love this idea. I particularly like how you put the ice cream cone inside! Very festive and fun. Thank you for sharing. Pinned!
Thank you Anna! I appreciate you comment. Have a great night.
Thanks so much for sharing your awesome post with us at Full Plate Thursday, 582. Hope you are having a great week and come back to see us real soon!
Miz Helen
Thank you Miz Helen, I love visiting your blog hop.
Elizabeth, these are great!!! I’d use the Dollar Store orange paper, too. Very realistic and the color shows up really well. Good choice! 🙂 I bet you had a lot of fun making these Easter carrots, too!! Hope you’ve got a pretty table set with them and some bunnies for your family for a fun holiday meal…
Happy Easter to you and I am happy to feature your post at this week’s Share Your Style #341 for you,
Hugs,
Barb 🙂
Barbara, thank you! I did have fun making them and eating the candy too! Thank you as well for sharing my post! I love your link party.
This is such a cute idea! I am thinking about making these for some of my coworkers. Thank you for sharing this post on the Home Imagined Link party.
Anna, thank you! They are so easy and cute!
These are adorable! Such a great idea. I would love to share these on my weekly newsletter. Hugs to you.
Thank you Renae, I hope that your readers enjoy them. Have a wonderful day.
These are so darn cute and would be perfect for my little granddaughters.
I will have to try them. You are always so inspiring. Thank you Elizabeth.
Wendy, I think your granddaughters would love them! Have a great week!
What a wonderful idea! These turned out so cute! A perfect little surprise for Easter guests! Pinning now!
Thank you Donna! Have a wonderful weekend.
Such a fun and festive way to celebrate Easter, Elizabeth. I love that you can put these in baskets, add them to a special tablescape or use them as party favors. They’re adorable! Can’t wait to share them tomorrow. Big hugs, CoCo
Coco, thank you! You are always leave such kind comment and I cannot thank you enough for sharing!
Have a wonderful week! A big hug back to you.
LOVE how quick and easy these carrots are to make!
Don’t forget to join us over at the Creatively Crafty Linky Party every Wednesday through Sunday
https://creativelybeth.com/creative-crafts-linky-party-2/
Pinned!
Creatively, Beth